Monday, March 22, 2010

Pictures from the weekend

Bonnet off:


BMW's Flappy Trapdoor AFM:


Side of the motor:


Karl with the engine out:


The snapped exhaust:

Sunday, March 21, 2010

More progress

Wiring looms are mostly out, all the carpet is out, the headlining is out, the seats are out, the aircon and heater cores are out.

I've treated more rust in the boot too.

Pictures tomorrow :)

Saturday, March 20, 2010

The motor is out

Last night, Karl came in and we removed the motor from the car.

All things considered, this was quite a task. We started around 10pm and finished at 4.30am.

It would appear that some massive over-engineering went into the design of many aspects of this engine - the amount of seemingly superfluous hoses running from manifold->air intake, radiator hoses, and numerous other items that seem completely uneccesary seemed a little insane. We'll see how much neater it is once we've made the changes we want to ;)

No pictures yet as we took them with Karl's phone and I haven't had a chance to copy them on to this machine for uploading (but we did take some!)

I also primed the rust repair in the boot. It's looking good - now I need to do the rest of the rust in the boot and prime that (And maybe get a rattle-can of "Resedagrun" top-coat to make it less "obvious")

The bonnet is off the car (as a side-effect of removing the engine) and i've removed the sound deadening and also the factory mounts. We are going to be using bonnet pins and in future will just lift the bonnet free of the car to work on it, this allows much better/easier access to it.

Pictures etc later :)

Friday, March 19, 2010

Rust converter

Just went and checked on the rust converter, and it looked like spots had re-rusted and popped "through" the converter. I can only guess that I left those areas too wet in the first instance, so i've rubbed them back with p80 and re-applied the converter (and only left it ever so slightly damp this time).

I need to get a heat gun to see if it helps with the sound deadening.

Also a set of calipers to measure/adapt the throttle body from an AU to the BMW manifold.

More text and some pictures later - for now lunchtime is over and it's time to go back to my real job.

Thursday, March 18, 2010

Progress Update

While working in the shed this evening on my partner's falcon (prepping parts of the car for paint) I got a little done on the E21.

Firstly, using a combination of my die grinder and a stone wheel, along with a wire brush wheel, I got rid of most/all of the surface rust on the left hand side of the boot interior.

Then, I applied a rust/converter and primer - this works by wiping down the surface with a wet rag (and leaving it damp) then brushing on the chemical which then begins a process through which it turns the bare metal (and any remaining small rust particles) a blue/black colour. The converter I have said "for best results" to apply a second coat after the first become touch-dry, and then spritz with water around 20 minutes after the second coat.


Tomorrow, or on the weekend, i'll further follow the instructions for this by sanding back with p80/120 sandpaper and then spraying with etch-primer or a new product I got today called prime-all (which appears to be a fantastic primer, as it's capable of being used on concrete, tiles, timber, and a whole plethora of other surfaces) This will then be left in primer until the rest of the boot is ready for paint and will then be covered in the top-coat colour just for the sake of uniformity.

As part of this process I also removed the factory jack (Which is a really cool design), the factory wheel chock, and spare tyre/tyre cover.

I've also started on the interior removal. The rear speakers have been removed and will be returned to my brother (when I remember to do so!) The rear parcel shelf carpet has been removed, along with the rear seat (both base and back). I've also removed the speaker and antenna wiring that had been run to the rear of the car. Anything needed back here will be re-wired later on.


It's been said before by others, but i'll say it again - removing factory sound deadening is a bastard of a job! I've spent the better part of an hour on the wall behind the rear seat and so far only approximately a quarter of the deadening is gone. To compound this it looks like BMW had glued a factory insulative layer behind the rear seat consisting of a material looking suspiciously like fibreglass. I'm not 100% that it IS indeed fibreglass but i've been playing it safe (and really want to get the few bits out that strands of this are glued to, so I don't have to try not to cover myself in it)

I spotted another small bubble of rust on the passenger side near the rubber trim (behind the door) - add that to the list I suppose! One thing I will say is that i'm glad we are going down the race/rally car track and not the restoration track - with this rust it would make a proper restoration a nightmare.

Wednesday, March 17, 2010

Some "light" reading

Just some light reading for those of you interested,

a member over at boostedfalcon pointed out the Moates Quarterhorse which allows for realtime tuning of the EEC-IV.

At $249US (around $270AUD + postage) it's hardly what one would call un-affordable, and would certainly save a lot of time starting, datalogging, stopping, adjusting, rinse & repeat behaviour that is required for the normal J3 tune with my existing chip writing equipment.

Moates Quarterhorse

There is a cool clip of it working "in-realtime" on youtube:

here

It sounds like it's relatively easy to convert the definitions from the TI setup (which is written for TunerPro) to work in BinaryEdit (alternatively, we could try using a newer, beta version of TunerPro which supports live tuning via the Quarterhorse unit).

I've also sent an email to Brown Davis regarding pricing for a four-point roll cage, CAMS approved. Hopefully we can raise enough money by scrapping all the random parts accumulating in my yard (as well as a car shell or two) to help cover the cost of this. Trying to see if we can keep costs down by getting the cage un-painted, and doing this ourselves (it's just like painting anything else, and this way we could do it the same colour as the car!)

Switches, Electrical, and a small update

The car needs a new battery before it will start again, and also the ignition barrel not letting the starter even try is driving me mad.

As a result i've just placed an order for the switches required for the car:


I already have the labels printed for the switches, however if anyone knows more correct German for the labels, please let me know so that I can re-do them before I make the panel to fit them to!

Below is the order I have placed (including some extra bits that will be needed, cable ties, solder, heatshrink, some extra wiring, label cable ties for looms etc etc)


I've also had another quick look over the car and there are quite a few spots where surface and other rust is starting to show in the bodywork. Unfortunately the last few years of the car's life being in a coastal climate has not been friendly in this aspect, despite it being constantly garaged. I'll be buying some rust converter and a few more wire brushes tomorrow to make a start on the boot area - i've already removed most/all the loose rust with a screwdriver and a small wire brush - what i'd really like is to get it converted and then primed. It can be given a coat of body coloured paint where needed at a later time (I may get some mixed into a rattle can however my father has some of this in acrylic for painting from a proper gun)

There are also a few small spots of rust coming up under the front windshield, which may require further attention. The area around the boot seal also looks to be potentially worse than first glances indicated however this will require removal of the seal and treating to guage just how bad it is.

None of the rust so-far has been a deal breaker however, so the show will go on :)

No pictures today as I really haven't made any progress to speak of. I'm just getting over a rather dreadful flu which has taken me out of commission for the last three working days and confined me indoors. Hopefully work tomorrow doesn't take too much out of me, and I'll be able to make some progress on this and other projects I currently have "on the go."

Alpina

Since there were some questions asked on one of the forums where this is posted, here is a brief explanation of the "Alpina" (almost 100% likelihood of being a fake) rear garnish:

Alpina is a BMW performance house. Not unlike HSV when it originally started (before it was owned by GM Holden). There are others too, like Hartge that date back to the E21 and earlier and are still around.

That said, this car isn't actually an Alpina. It looks like some genuine or pretend Alpina parts may have found their way onto the car, but the Alpina E21 was known as the B6 or C1 not as a 323i. There were also no Alpina's released outside of Europe so any Aus delivered cars or US delivered cars claiming to be E21 Alpinas are fakes.

The body kit is BBS, wheels ROH. Most of the other parts seem to be factory fitment or aftermarket add ons (looks like the boot lip spoiler was possibly a factory option from a sports model of the E21) and the rear garnish is the only part I haven't really verified - the standard E21 rear panel is just a boring black piece of plastic - so certainly this is a nice addition, although its authenticity as a genuine Alpina part is questionable.

See the B6 below for different front bumper, and Alpina vinyls:


And normal E21 Alpina rear:


Apparantly there was a guy in Australian who for some years, was selling knock-off parts claiming them to be Alpina genuine - it wouldn't surprise me if this is where the rear garnish has originated from.

Tuesday, March 16, 2010

The Car

Hi all,

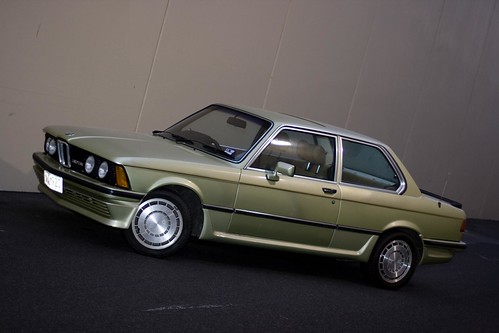
This first post will serve to introduce to everyone reading the car with which we are starting.

As our base, we have one 1977 BMW E21 323i with Getrag 4spd Manual transmission.


We have just recently done a garage cleanout and as such now have room to house the "beast" here. I have also recently come into posession of an engine crane which will assist greatly with our plan of attack (more on that to follow)


Current problems:
Car heats up and overheats very quickly
Some rust
Ignition barrel does not trigger starter motor MOST times (95% of attempts)
Engine bay is a nightmare of hoses/pipes etc.
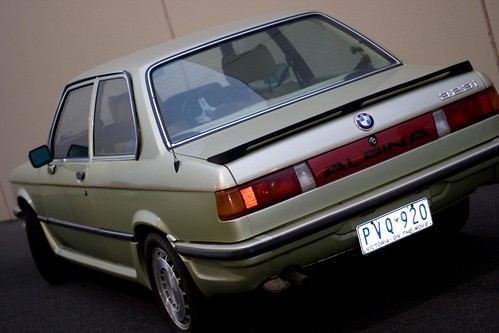
The previous owner had the standard twin-system exhaust replaced with a single exit unit


For the sake of lightness, I have already removed the radio antenna, although this has left a hole that will need to be covered. So far we are thinking some form of CB antenna as this may be needed for communication (although will look further into classes we want to use the car in to see if this is a necessity, otherwise perhaps some form of vinyl (perhaps tow point or battery triangle?)


We will probably be leaving this cool toolkit in place, although unfortunately some pieces are missing!


The car already has an aftermarket steering wheel and boss kit. It remains to be seen if we will keep the steering wheel but the boss kit is handy as it will allow fitment of any aftermarket wheel.


We found a sale receipt inside stating that the car was sold with 212,000kms for $6,000. Since then it's travelled a paltry 6,000 extra kms.


Now, the plan thus far is as follows:

Add lightness by removing:
Interior trims and carpets, sound deadening.
Air conditioning setup

Add simplicity by removing:
Cruise control setup and all associated wiring
Bosch K-jetronic fuel system

We are going to be replacing the Bosch K-jetronic fuel system and standard distributor based ignition with most of the factory componants found on a 1994 Australian Ford Falcon (EF). This includes integrated Ford EDIS ignition, full EFI, ECU based thermofan control, and allows us full tunability and easy to get spare parts.

We will need to build a custom fuel rail, and adapt the EDIS ring/sensor to the BMW motor. We can leave the distributor in place to solve any issues in that area.

With a J3 tuning chip from www.tiperformance.com.au we can adjust some areas of the Ford tune - however most will be fine as we will be adapting the Ford throttle body and with it the Idle Speed Controller, Throttle position sensor etc. We should be able to get it started and running purely changing the "Engine displacement" scaler from 4.0L to 2.3L, then fine tune using a wideband oxy sensor and datalogging equipment.

One of the more difficult parts of this conversion will be fitment of the EDIS trigger wheel pictured on a Ford harmonic balancer here:


There are a few guides on the internet re: machining both the factory pulleys and the EDIS trigger wheel, so hopefully this will go down without a hitch. My grandfather has a metalworking lathe so hopefully I can get his assistance with this part of the process.

This will mean we can run wasted spark with the Ford Coil Packs (and means we can use spares from an EF or AU falcon!):


The ford EDIS sensor mounts to the timing cover but an appropriate bracket can be made once the trigger wheel is mounted. The ford timing cover is as below:


We have a box of looms to play with plus an EA and an AU donor car to play with. We still need to obtain an EF ECU and an additional J3 chip. I have a tuner already from our other cars (we have two Australian EB Falcons (1991-3).


The reason we are going with the EF setup in particular is twofold - firstly, the use of EDIS triggering allows us to avoid complex engineering required to mate a Ford distributor to the BMW oil pump drive shaft, meaning we aren't "up the creek without a paddle" in the case of a failure. Also, the AU setup (while newer) is less supported by our chosen tuning method (the J3 chips).

The benefit with the method we have chosen is that it is cheap, easy to maintain, replacement parts are easy to come by, and that these parts should be easily adapted to fit the BMW motor. Another benefit is that these EEC-IV units are setup to run from Manifold Air Pressure sensor, and not from a restrictive MAF sensor like many other factory setups we could have chosen.

A distinct disadvantage (although one we feel is minor) is the lack of ability to tune in realtime - instead we need to datalog load vs RPM vs AFR and adjust the tune after the fact. This has not yet proven a major hindrance for performance workshops tuning the TI performance J3 enhanced Aussie Falcons so it should not cause us any undue hassles. Conveniently, there are adaptor looms for the EEC-IV to Megasquirt which can be used if we find the EEC-IV restrictive for our requirements.

To acheive this the motor needs to be removed from the bay. At the same time we will be looking for suitable replacement radiators, as well as adapting for use the thermoelectric fan from an EF falcon (these are lightweight but importantly move a LOT of air). While the motor is out of the bay a new water pump will be fitted which was sourced (including postage!) for under $100 direct from ebay.de

We will be fabricating other parts (strut and underbody stabiliser braces, etc) as well as relocating the battery to the boot.

We will also be converting and re-priming any rust we come across in this process to prevent further loss.

The exhaust will be rebuilt as a twin system with no mufflers and replacement headers will be fabricated from steampipe to replace the horrible Heated Air Recirculation Cast Iron factory manifolds.

We will also be building a race style switch setup for starting the car and accessories using toggle switches and push button start. The labels for these functions will be in German (in keeping with the car ;))


For those of you who are unfamiliar with these cars, the BMW E21 323i has IRS standard, this car has Koni yellows in the rear, and unidentified (but suspected standard bilsteins in the front) The 323i has a stronger rear setup than all the other E21s (Which are prone to bending, from what I've managed to read on the internet). The engine also appears to run a single overhead cam and revs to around 6,500 rpm.

I'll post more as progress is made.