I found 2 of 3 I know exist. It's tough since video wasn't such a big deal back in the day.
Clinton's garage diary; builds including E21 with 4.0L Ford I6.
Thursday, August 17, 2017
EA Fairmont Turbo Videos
Josh reminded me to post up a couple of videos of the EA.
I found 2 of 3 I know exist. It's tough since video wasn't such a big deal back in the day.
I found 2 of 3 I know exist. It's tough since video wasn't such a big deal back in the day.
Wednesday, August 16, 2017
My 1990 EA Fairmont Turbo Build
As per my previous post, the loss of access to all the photobucket images I'd used on this blog got me thinking about other content I had stored on other third party sites. I have decided that I will copy, re-edit and re-post (and re-instate the images) from my previous vehicle builds.

I'm starting with my first car, a 1990 Ford Fairmont. Built in Australia, with a Centre-point Fuel Injected 3.9L Inline 6 and 4 Speed Automatic Transmission. This vehicle was given to me by my parents when I got my licence, and is the vehicle with which I started my journey down the slippery slope that is being a motoring enthusiast.

The first job we completed before I got my licence was to cut out some rust around the roof. My dad has done a lot of panelbeating and painting over the years at home so this is something we did, rather than paid someone else to do.


The car in it's "standard" spec. Note the colour is "Rosewood" - Ford replaced this colour in the EB with Cardinal Red which is similar.

Standard 3.9L in CPI 120KW guise.


I fitted a pair of 6x9" speakers (since that was all the rage, back in those days!) - thankfully using spacers rather than cutting into the parcel shelf.

My parents had this Sony headunit fitted to the car because the standard tape deck was... a tape deck. I fitted the Clarion EQ to give me an auxilary input (because back then, most headunits didn't have one) - an input I never ended up using.

The factory horns stopped working, so I fitted a twin tone air horn.

Someone opened a door onto some top quality bog repair work we'd done on one of the rear wheel arches, so we had to fix that.

While we were at it, we also painted some mirror covers and door handles from a parts car I'd bought to do a manual conversion:


Removing and refitting Falcon door handles still remains one of my least favourite things to do on a car.

I also fitted some purple neons to the footwell. I think I still have these in a box somewhere. Remember this was back in the days that the original Fast and Furious came out; I wasn't silly enough to go putting neons under my car though!

Then had a couple of bad runs - got rear ended down the main street here in Warrnambool by some P plater not paying attention to where they were going,

Then got crashed into by someone turning left from the right hand lane of a divided section of road in Anglesea.

At this point, it was becoming rather obvious that this vehicle was riding somewhat like an ocean liner and that needed to be rectified. The bug was beginning to bite!

Karl (who has possibly been one of the biggest driving forces in many of my projects) came and assisted me to install King Spring Superlows:

We also removed the mud flaps while we were at it - otherwise they'd have bottomed out in no time! This photo was taken immediately after putting the vehicle down on the new springs for the first time - so they settled lower than this down the track.

Once settled it began to look a little more respectable. Those hub caps have got to go though!

Luckily I got a bargain on a set of Genuine Ford EB S-pac 15x7" Alloys.

In preparation of a Multi-Point Fuel Injection conversion I was planning (but had no idea how to carry out) - I had removed and polished up the fuel rail from my MPFI parts car.

I picked up a set of clear indicators. This has been a mod I've done almost first on every car I've owned since this as it is such a subtle change that has a dramatic impact to the overall look of the car.

Next I cut my teeth on my first mechanical work - having never so much as changed spark plugs I did a MPFI swap - including inlet manifold, wiring changes, injectors, heater hose changes and more. I had plenty of coolant leaks etc to sort out after this which I've never had in subsequent conversion (so I must have learned from my mistakes!)


I also purchased genuine centre caps from Ford to suit these wheels which made a big difference for a small outlay.

I also attended my first (of MANY) E-series owner's club Annual Great Ocean Road cruises. To say I was hooked on the road is probably an understatement. Suddenly handling gained more of a focus - but it was also blatantly obvious that my Automatic transmission's days were numbered - both in mechanical longevity and my own patience.

Around this time I blew up the original diff and had a 3.45:1 open differential built to replace it.

I also found the front bumper extension normally fitted to Falcon S and Fairmont Ghia in the EA and retrofitted it to my car.

I also purchased and installed a set of Pioneer splits which I still have to this day (they're currently installed in the EF Fairmont tow car we have).

...and a tiny aftermarket steering wheel.

I fitted a K&N Panel Filter and the Snorkel from an XH ute (from memory this was basically the same bellmouth as on later cars but the only one that suited the top feed airbox). Then I cut the lid off because it sounded better.... hey at least it still had SOME source of cold air - I still have a love affair with induction noise to this day!

RDA slotted brakes all round - I'm not sure if the original rotors were cracked or if I just replaced these because my original pads were shit (and I thought I needed rotors as well?)

I'd fitted a 2.5" exhaust, genie (or similar) short extractors and a gutted cat as well as the T5 Manual - then went to a dyno day at Hallam Peformance and the following week the head gasket let go (for the second time in this car, as I understand). The car did make 117.6rwkw which suitably impressed me given its original 120kw @ the flywheel beginnings.
I fitted an unknown Wade Cams reground cam that I bought for something like $50 and took the car to heathcote park and did a 15.29 on the 1/4 mile. I also came runner up in the DYO racing on the day - not bad for a first timer!

The first parts car had donated so many spare parts that we had to cut it apart to get it out of the yard. The diff was stored in a pile of trees and timber for years and actually ended up in another project!

Then I bought another parts car. This is possibly one of the first 10 turbocharged E-series created back in the day - originally being built by Dan McIvor (dansedgli). I'd seen the car at a All Ford Day and running at Heathcote park the time I went, and when he had engine troubles and decided to sell the car as a going concern I decided that it would make more sense to upgrade my car with lots of parts that were much better than what I had, rather than to replace one aftermarket cam or exhaust with another for potentially tiny gains.

Around this time I moved into a house where I lived for around 8 years - one with a pretty decent shed and more importantly - a pit! No more working on the ground - well, until I moved from there, at least! I removed the S-Pac wheels.

Dan's ED was Automatic. I couldn't handle the idea of going back to a slushbox after my newfound control in my manual converted E-series so I purchased a T5Z from Mal Wood Automotive. The basic idea was this was a BA XR8 gear set installed into an E-series housing.

Also a custom steel flywheel and (from memory 10.5") brass button clutch.

Some new wheels - ANZ Tycoon in Shadow Chrome. I wish I still owned these wheels to be honest as they'd probably look ok on the EF. They're also the only wheel I have ever purchased brand new.

Ghia interior fitted from the donor car, including the door trims which allowed me to get rid of my MDF door pods!

This is the half leather, half velour trim that was optional (vs full leather) on EB2 and ED Fairmont Ghia. I did fit the dark grey interior door handles from the EA to try and tie in with the dark grey dash and centre console (EB2/ED have lighter grey on the lower half)

The two cars sitting side by side waiting for a transplant... I also fitted the Fairmont Ghia garnish to the back of the car which transformed its look.

My first AU 4.0L. I purchased this from the local wreckers. AU motors are at least in theory, superior to E-series motors. EF motors got hypereuretic pistons, better balance etc, but by AU they had alloy sumps, integral rod bearings, crank girdle, nitrided crank and lighter rotating mass.

This is also around the time I got my Green NB8B MX-5 - if I can find anything about that car I'll post about it also - this meant I now had a daily driver so could afford to take the car off the road for the turbo conversion and take the time to do it right and get it tuned before destroying anything.

Manifold and turbo sitting waiting, patiently.

Bonnet removed ready for the big job.

The intercooler piping on this car was really short and quite simple and efficient. Straight out of the turbo, under the driver's side headlight into the end tank of the cooler and then straight from the end tank back under the passenger side headlight and into the throttle body.

Old faithful was a bit oily by the time it got removed. Just a few gaskets well overdue for replacement.

It had managed to pull 128rwkw on a dyno a week or so prior (this with the Wade 945 or whatever random profile it had fitted)

Much cleaner AU 4.0L going into the bay. Note that I retrofitted the three belt setup from the EA to this motor. In hindsight and having done it a number of times since, I should have taken this opportunity to convert the car to serpentine belt.

Inlet manifold fitted, complete with relocated ignition coil; anyone who has tried to change the coil on one of these cars before can probably guess why I decided it needed a better (more acessible) home.

I cut the adapted wolf3d V4 loom out of the donor car and re-attached it to the EA. My first exposure to a more in depth wiring job and thankfully it worked without any complications!

Much neater once all back together!

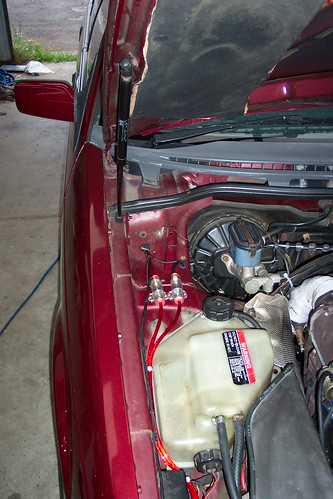
High mount turbo - GT3540r and pod directly behind the power steering reservoir because the EA battery mount got in the way of the intake pipe that had been fitted in the donor car (which had a battery installed in the boot)

AU Thermofans mounted to EA radiator (I since learned fitting EF/L fans would have been a much easier, more sensible option).

K-Frame modified to ensure sump clearance. The AU sump can be ground down enough to clear in many cases however for me this wasn't the case so I had it modified. I also figured it would make it easier to put in any replacement engines etc down the track.

Relocated the battery to the passenger side of the bay where the factory airbox normally is, and the pod filter to the normal battery location. Note the electrical tape on the pipe is covering some foam - the intake pipe originally rattled on the power steering pump a lot at idle.

Intercooler nice and concealed.

Pod filter shrouded from hot engine bay heat. Not ideally, still located next to the radiator header tank.

Conversion completed.

The vehicle got tuned at 211rkw at 12psi with some serious ignition breakdown or valve float high in the rev range. Effectively it made 211rwkw at 3500rpm and came on boost HARD. The dyno graph above is from Braune's in Portland months after the initial tune.

My dump pipe just snapped off one day, so I got that fixed.

Stereo wiring and turbos don't mix, as it turns out!
Re-routed my amp wiring to the far side of the bay.
Anyway, basically had a heap of fun in this car set up this way (at some point I put the 3.45:1 LSD in from the donor car too) and then one day it blew up, in a big way.


I couldn't afford to fix it so I sold it, blown up.


and thus - as these things do, one chapter closes, and another opens.
Subscribe to:
Posts (Atom)