Saturday, September 7, 2013

Injector change

So, a little more progress. We managed to sort (I hope) the fuel system problem - by the looks of the tank, pump pickup and filter, the fuel system contaminants were trapped in the fuel rail/regulator itself.

As a result, I obtained a replacement rail. Originally I was looking for an AU rail and regulator, hoping to pick up some OK injectors at the same time; instead I located and acquired the rail, regulator and injectors from a BA XR6 Turbo. These injectors are still a bosch item, still have the EV6 connector (so plug right in) and are actually the same injector on the non turbo as the turbo cars.

  The difference between the turbo and non turbo BAs is in the regulator. The non turbo run a 300kpa/3 bar regulator, and the turbos run a 400kpa/4bar regulator. This means the turbo flows 25% more fuel with these injectors (above the manifold pressure) than the non turbo. In E-series setups, the standard regulator is a 270kpa item and XR's run a 300kpa reg with the same injectors. For some time it's been possible to lean out XR's slightly by running a 270kpa reg and actually make a little more power provided decent quality fuel (hey, it's rough but supposedly works) - a side note is that the EEC-V is pretty smart and actually learns around things like this (or like running AU injectors and reg with an EL tune) given 1-200kms of driving and a working o2 sensor.


While you can get away with running marginally larger injectors and the ECU will learn around it (or it will be just "o.k.") you can't expect to get away with a massive change. For this reason, traditionally you need to upgrade to an aftermarket ECU to change injectors - or use some sort of interceptor to scale the injectors or airflow readings (some Japanese cars use these methods) when upgrading injectors. In this instance, standard E-series injectors are approx 19lb/hr and from what I could find (ex Bosch and the part number on the injectors I now had - http://www.bosch.com.au/car_parts/en/downloads/fuelinjectors.pdf) the BA ones are 213 grams/min or 28.175lb/hr@ 270kpa. Of course I don't have another regulator that works other than the 400kpa one that came with this rail so I had to adjust for that difference - 400kpa vs 270kpa is a factor of 1.48148x meaning the BA injectors in the rail with turbo reg are effectively 41.74lb/hr injectors - more than double the flow of the standard ones!

Now I say 19lb approx on the standard injectors. I adjust the tuning on my falcon ECU using a J3 chip from Jason at http://www.tiperformance.com.au who has been very helpful any time I've needed assistance understanding the processes involved in adjusting the tune. The beauty of this system is that it takes about 1 minute or less to send the tune to the chip and no more than a minute to re-fit the chip to the ECU - add to that I have a switch to effectively disconnect power from the ECU and it makes removing/reprogramming and testing adjustments a very fast process indeed.

The J3 tune I am using (in TunerPro) has a variable called injector slope mapped. This handy variable is set in my base tune to 18.79lb/hr. The Bosch documentation states that my factory injectors are a 19.8lb injector at 270kpa. The reason for this difference I believe is due to the fact that the injector flows published by Bosch are tested using N-heptane and not normal fuel.


I initially set the ECU with 36lb (the internet consensus for turbo injector flow) and after removing all the spark plugs and cleaning them with a wire wheel, the car started and ran, however would not re-start unless the fuel pump was switched off while cranking until the engine sounded like it wanted to start (lucky I have a switch for that!) which to me indicated that there was way too much fuel. Further research garnered the figures above and I tried 41.74 which allowed the car to start without any application of throttle however resulted in some hesitation upon throttle input (to me indicating a slightly lean condition) - it's to be noted that I have no intention of doing any power runs with the car in this condition, purely moving it around the driveway at home so I can get other vehicles in and out of the shed or to test things like the new power steering lines (which I now know work fantastically, along with the alternator charge wiring!!).

Further research lead me to the N-heptane/normal fuel discrepancy. The original injectors were rated at 18.7 in the tune vs their published 19.8lb/hr. Could this mean that standard fuel flows 94% of the published N-heptane flow? I have applied this to the ECU with a resultant reading of  39.42 (I set it to 40) and it now starts and idles without throttle, does not seem to hesitate on throttle input, has decent torque for reversing up the hill that forms part of my driveway, although does still tend to have issues with immediate re-start (overfuelling) - thankfully, now that I have an alternator charging the battery I'm able to turn off the fuel pump when shutting off the engine, then not turning off ignition until the engine starts to stumble. This seems to allow re-starting of the engine without issue.

The next step (while the front is removed) is to make radiator hoses for top and bottom - the top I can make from a commodore top hose as they are the right size and have a nice sharp 90 degree in them as required. The bottom will require more work and may need a metal adaptor made up. The side/reservoir feed will be a bit more difficult and is likely to require modifications to one of the headlight brackets and some tricky hose routing. We'll see how that goes when it comes time! Also to be done - making a thermofan fit. We've got one we modified early to be as trim as possible, it's now a matter of making some sort of bracketry to fit it to the car behind the front grille and in front of the radiator. Hopefully it fits just right!

Tuesday, August 27, 2013

Power steering!

I have power steering at last!

Firstly, I must apologise for the relatively poor images. I've got to wait until I can get the car out into some sunlight to get enough decent light for a photo. 


My old mate Warrick came around and modified the original BMW power steering lines (yes, for those of you disbelievers out there, some E21s DID come with power steering - mine for instance!) which normally run to the passenger side of the car and to a seperate reservoir and pump, instead running the pressure from the falcon pump (which conveniently has the same type of fitting as the BMW one) and the return straight to the pump also. 


 At the moment the lines just clear both the exhaust and the power steering. Once the exhaust is properly built, these will be moved to clear that correctly and properly secured.


This meant I could also finally fit a belt. Doing so appeared to be a larger job than anticipated, requiring removal of not just the radiator, but the radiator support bar, headlamp bracket assembly, and front plastics (light surrounds, indicators and kidney grille). Some modification will be required on these parts prior to reinstallation to ensure that should I ever need to change a radiator in a hurry I won't have to remove half the car to do so.


Another photo, this time at the back of the power steering pump showing the factory BMW power steering line going into the back of the falcon pump.


While we were doing this, my daughter Scarlett decided that since this was a race car, it needed (more) stickers - she added these while we weren't looking.


Also, a donation to the cause - a set of headers which I will be cutting up and modifying to work with the constraints of the bay and steering linkage.


Unfortunately it's not all rainbows though. The fuel system appears to have gotten dirt in it causing all sorts of issues with the fuel pressure regulator and with the injectors. I'm going to try and source another fuel rail with injectors and a regulator to suit - just as soon as I can work out which model (EF/L/AU) has a fuel rail with hose clamped lines, rather than screw on ones.

As a result, I was only able to test the steering through part of a rotation between the engine failing to start or failing to run once started (unless someone was constantly messing with the regulator) - this brief period also verified alternator function - something I hadn't been able to do prior to this point because of the lack of drive belt necessitated by the lack of power steering fluid.

Saturday, July 20, 2013

David's 1974 VW T2 Kombi Camper

David, who I work with, has just taken on a new project in the form of this 1974 "Martini Olive" Volkswagen T2 Camper. I thought I'd snap some shots and maybe video as the restoration work may prove to be extensive and of interest to some. Keep an eye out here for progress shots.


Basically, the interior is shot and needs to be ripped out and replaced, the front panel needs replacing and a number of other surface and more serious rust patches need repairing. The underside and engine both appear sound, which is a nice change for such a car.

More to come as it happens.

Monday, June 24, 2013

Garage shot

Just a quick shot of the car, sitting waiting for power steering lines to be bent to shape and fitted.


Sunday, June 2, 2013

DIY: Changing E39 front swaybar end links


This 1998 E39 540i Automatic is my daily driver. Recently it had begun to develop a nasty clunk over bumps coming from the front suspension, so I did a bit of research and discovered the most likely culprit would be the swaybar end links. It turns out you can look at the sway bar end links with the car sitting on flat ground and the wheels turned full lock in one direction or the other (depending on which side you want to check) rather than having to jack the car up in the air to get at it. The end links are located in front of the upright assembly.

I took a look at mine, and it turned out that the boot on the driver's side upper end was torn, so that was enough for me to order a replacement end link for each side of the car (figuring that if one is gone, the other is generally not far behind)

You can buy these parts from BMW however in Australia, BMW charge an "australian" tax and you generally pay 5x their normal value had you purchased them anywhere else in the world. As such, I looked into alternatives and soon discovered that the BMW parts are OEM by ZF's sub-brand Lemförder. The part number is 19387 02 009 (BMW part: 31 35 1 095 664 - search eBay for suitable end-links) - the parts fit either side of the car so you need two of the same part number to do the whole car. The Lemförder kit includes new nuts and washers, where some other brand kits do not.

Some of the guides on the internet state that you need to jack the car up to "unload" the suspension - this is not true, the swaybar is unloaded as long as the car is on level ground, it is only loaded if you were to jack up one side of the car at a time. To be honest, it's probably more comfortable to jack the car up and remove the wheels, but if like me you can't be bothered, it's quite possible to do it with the wheels on the ground.

What you need:
  • New end links (duh)
  • 16mm open end spanner
  • 16mm socket
  • Ratchet handle
  • Breaker bar (or muscles)
I haven't got any photos of the process as my new garage has exceptionally poor lighting which is not conducive to capturing any sort of imagery (abysmal or otherwise)

Basically the process is as follows:


  1. For RHS of the car, with car on level ground turn the steering full lock to the right; for the LHS you will need to turn the steering full lock to the left.
  2. Use the 16mm open end spanner to hold the ball joint side of the end link (look at the new one if you don't understand what I'm talking about) - you can undo the top or bottom in whatever order you like, it doesn't matter.
  3. Use the 16mm socket and ratchet to undo the nut on whichever (top or bottom) link you have the spanner on. You shouldn't need the breaker bar to undo this unless the incredible hulk last fitted these parts to your vehicle (or if you are exceptionally weak ;)
  4. Remove the other end as well, then remove the end link.
  5. Install the new end link
  6. Install the nuts finger tight top and bottom; this prevents cross threading the nuts which can sometimes occur when using power tools. Note it's also recommended that you only use hand tools for this process to prevent damage to any mounts or to the end links.
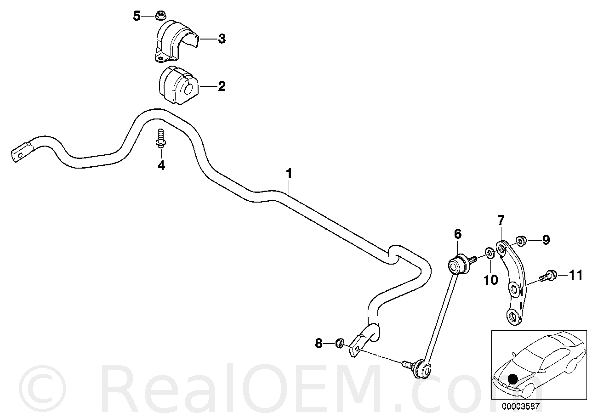
  7. Note item 10 in the image above to ensure you install the washer (my original end links were missing this washer on both sides, and as a result the noise my car had was due to the RHS end link working loose at the top) - of the two nuts included in the end link pack, the top bolt is the larger of the two with the free-rotating washer.
  8. Tighten nuts using the open end spanner to hold the end links - ensuring you don't push the rubber ball joint boot off the end link (if you do, make sure you use a smooth/old flat head screwdriver or similar device to reinstall the ball joint boot)
  9. Tighten down as hard as you possibly can using the ratchet handle (unless you're the incredible hulk). If you're incredibly weak, you might want to use the breaker bar to help get these tight. Note they have to be quite tight to stop them making any noise.
  10. Go back to #1 and do the other side of the car
Then all you need to do is test drive the car to approx 180kph and ensure you no longer have strange suspension noises.

In my case it was immediately obvious as the loose end link was noisy even just pulling in and out of my driveway - the new found silence is amazing, having the new joints fitted has made the car feel a lot more stable at speed also.

Tuesday, May 7, 2013

E21's on YouTube

I was just directed to the following video by PimpPalaceCustoms who is also responsible for the mad looking Mid Mounted Mazda Mini Truck. No interior? No Bonnet? No Problem!


This awesome video got me thinking back to the some of the videos that have helped re-energize this build as it's progressed, and I thought I should post some examples here.


Another E21 engine swap - this one with an EVO motor is laying down some very controlled drifts:

Some group 5 hillclimb video, mainly for the sound to get the spine tingling and help with motivation:

Hopefully I'll have similar traction issues to this car:

Here's a video which I found via the European Car Club of Australia Forums shortly before I got my motor running:


Here is an example of what NOT to do:


This is the reason I've not thrown away my original M20 - audible magic - turn up your speakers:

While I'm on the subject of M20's, eBay Germany has listed this very rare Hartge Rocker Cover

I also noticed an auction running for a set of yellow headlamps; might be worth a look if that's your thing:

Even if you don't speak German, this Magazine could be a good little conversation starter on the coffee table:

Also, I've posted one of these before - but here in a different livery is another Group 5 Model:


Thursday, May 2, 2013

eBay Germany E21 Round-Up

As I have done a couple of times before, when I go on eBay.de to have a look for cool E21 parts, I summarise and post them here for anyone else interested in these cars to take a look at - tonight is no exception and eBay Germany delivers yet again!

First up, I've found what appears to be a set of the BBS rear bumper under spoilers or spats. They are currently only asking 50 Euro and I've only ever really seen the actual front bumpers up for sale so I'd say these are relatively rare.


The second are a pair of chrome mirrors, these would look quite cool on the right car. They don't really suit the track purpose of my car, but might suit one of yours?


I also found some cool seats, first there's a Single E21 recaro seat - then I stumbled across a set of Alpina trimmed seats, my german is basically non-existant and as best I could glean from a translate these were fitted at some point to an E30 touring so the back seat might be no use; however the front ones look the goods!

Next I came across a black M20 manifold - this looks pretty cool and would probably be an easy/quick way to change with your existing unit to mean minimum downtime if your E21 is a daily driver - at currently less than 30 euros it's not particularly dear, however postage may be a killer due to the size and weight.

I also found an M10 Alpina airbox which is very cool! (and very dear) but worth a look for you purists:

If my E21 still had an interior, I'd almost certainly pick up some M-sports styled leather gear boots - especially for under 10 euro.

For those of you interested in doing an EFI conversion (as I was originally intending) you might want to check out this M30 manifold modified to fit M20. If I'd been sticking with the original M20 motor I'd also have looked at these quite seriously - E21 6cyl headers/extractors or these ones which look a bit more substantial.

I'm also thinking about getting myself a BMW Service Team Jacket but not sure if that makes sense given my choice of powerplant. 

Moved At Last!

So it's been a pretty hectic week here; we got the keys to the new house on the night of the 24th and got stuck right into moving house on the ANZAC Day public holiday on the 25th.

One of the first things to be moved (due to trailer availability) was the E21. We ran into some difficulty getting it onto the trailer because of an exhaust flange - in the end we needed four boards under each ramp AND to jack up the front of the trailer with the trolley jack before it would clear. I've got to track down a short video of the car sliding on the ramps trying to get on so I can show you all, hopefully sometime in the next week or so I should be able to get my hands on a copy.

Loading up in the driveway of the old house

Safely stowed in the garage at the new house

This is the view from my study (where I write these updates)

I am now going to be walking past the car every time I go between my study and the house (as there is no door directly between the two) so progress should continue - it may not be at its recent breakneck pace however!


Although the new house does not have the same amount of floorspace in the garage as the old shed, it does have an additional workshop which seems to be much better insulated (being brick and tiles) than the old shed and so should be a little nicer to work in during winter. I'm using the smaller workshop as a storage building as well as locating my press, drill press, bench vice and general workbench etc for fabrication.

The front garage will house my shadow boards and tools for actually working on the cars, but to maximise space I will keep actual stored parts etc in the front garage to a minimum.

The mower (as seen in previous posts) is getting a workout moving load after load of stuff from the front yard to the back. There's not enough room to get a car down here but a small trailer and the mower fits easily. This trailer was on loan for a couple of days, but I have an old A-frame here and some spare steel so I will begin to make a trailer up purely for this purpose soon which will make transferring heavier items between the two locations a breeze.

Slowly filling up - more has been put in since this shot but I haven't got a more recent photo yet. It will all change quite a bit so I'll put a few more photos up as I go.

Here's the new front yard - the E21 just visible in the right hand bay of the garage.

The left hand bay is currently totally full with boxes from the shed, the BBQ, bookshelves and other items.

Lastly, here's a video from unloading the car: