Thursday, April 4, 2013

Frenzy Night #2

So, night two and we're back at it. Finished welding the boot and gave it a quick spray to prevent any rust.


"Installed" the fuel tank:


While I cut up a Falcon pedalbox (will install this tomorrow)


Michael got stuck into welding the tab for the remote battery cut off switch. All tested and working a treat!
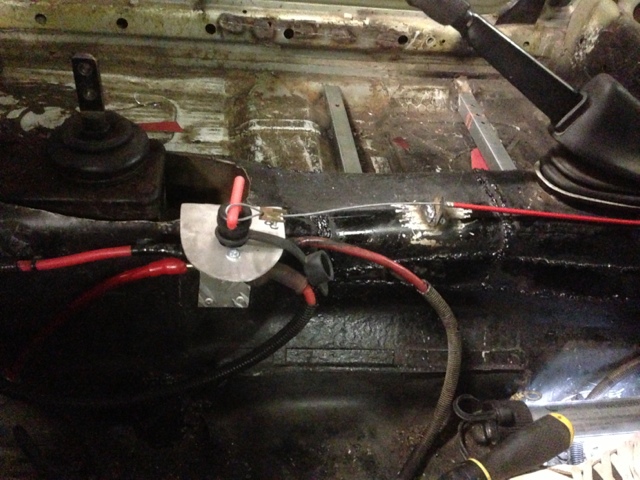

He also fitted up the exhaust so we can check clearances and start building a more complete system.

I removed the factory pedals (for brake, clutch and accelerator) and then went to install the seat with proper bolts and discovered that somehow two of the holes are off kilter, so will have to be re-drilled. At that point, we called it a night and will tend to the seat position tomorrow, followed by mounting the pedals (I need the seat in place to properly locate these)

I also plan to mount the passenger seat tomorrow, and potentially (provided I can get to the store before it closes) run fuel hoses from the factory lines to the boot (and a filter) and possibly replace the engine fuel rail with an AU falcon one which will allow fitment of a hose directly to the rail rather than having to use hoses with screw fittings on the end.

The heat is on!

This blog is about to get very busy over the next few weeks!

Basically, I've got to have the car able to move under it's own power within the next 3-4 weeks - preferably drivable for 5-10km's so I can put it on a single trip unregistered vehicle permit and not have to hire a trailer as I have to move it to a different location.

I've enlisted the ever-willing help of Michael "Hamo" Hamilton to get as much done, properly, in as short a time as possible. Tonight we got stuck in and knocked quite a few tasks off the list:


We cut the fuel feeder pipe - I am going to use the bottom portion of this pipe to run the hoses from the factory lines to my in-boot falcon fuel tank.


Hamo installed the "external" battery cut off pull - see below:


This runs to the cabin and will be affixed to a bracket that means when it's pulled it remotely cuts the battery power by turning the switch located between the driver and passenger seats (as previously discussed)


I got stuck into welding up the sections of the boot floor removed to allow the Falcon fuel tank to fit.


I've put as many progress shots here as I remembered to take :)


Proper templates would have probably saved me a bit of time/effort here.


Finished one of three holes


Meanwhile Hamo moved onto mounting all the wiring - note I obtained a Jaycar terminal block (in the middle on the board) to facilitate distribution of power to the fuses.


A closer shot showing the relays, fuses and distribution blocks.


Mounted up under the dash - because the passenger seat will be right back as per the driver's seat, there should be no danger of kicking these wires - having them low enough to access should make it easier if we need to adjust/troubleshoot them.


Another of the boot holes filled:


Started on the third before running out of time/patience/capacity to inhale fumes.


Hamo moved on to the steering guibo as this was only very loosely attached.


I'm sick of bloody seam sealer catching fire! Once your weld is at it's flash point, it keeps re-igniting itself until the weld has cooled sufficiently.

Tuesday, April 2, 2013

Franken-tunnel filled

I sprayed this black to protect from corrosion prior to taking final photos, so decided to get out the DSLR to take these shots. For anyone interested, it's shot on a Canon 7D, 16-35mm f/2.8L and with a 430ex speedlite.


Close up of the driver's side.


Zoomed out shot of the driver's side.


Rear section, replacement piece made by bending around the cut off section of the sway-bar.


Overhead view.


Passenger side - close up.
 

Another passenger side shot.


In the corner near the back seat base - lots of flammable seam sealer here made for hard work, I overlap welded in  an inverse bent section to bridge the gap as I couldn't get it any closer with hammering or levering.


Zoomed out passenger side. 


The handbrake's new "down" position. It's higher than standard but should not pose any issues in use. If it does, I'll cut and re-weld the handle.


The remaining cuts are from underneath and only open into the cavity which passes over the tunnel; Initially I probably won't worry about welding these - another shot is below:


Next job is to make the mounts for the center bearings - I think I'll just weld a nut to a peice of drilled flat stock and then bolt that to the bearing ears (bent per the image below) and weld that to the original (cut down) center bearing mounts.


In case you were wondering; here's a shot of the pit showing a little more on how I lit these last few shots - every other time I've tried to shoot from under the car I've had trouble with really harsh shadows - bouncing the flash off this piece of white board allows me to get a much larger (and softer) light-source. 


Monday, April 1, 2013

E21 BMW 320 IMSA Turbo


This amazing cutaway of an E21 320i IMSA Turbo is well worth a look; I've had it printed on A2 ready for laminating to go up in the shed and through I'd share (click to enlarge)

Neat JPS E21 image

Found this while searching for something completely different - thought you guys might like to see:


Sunday, March 31, 2013

Filling in the transmission tunnel

So I got a chance to go back out to the shed in the waning light of day, unfortunately my work light (pictured below) doesn't really cut it for visibility with the welding mask on anywhere near as well as sunlight does, so I much prefer welding during the day for this reason.


This photo was taken mainly to illustrate the smoke, although this is nothing compared to when I first started getting my phone out of my pocket. These photos are now taken with an iPhone 5 as I have upgraded (previous shots were primarily taken with an iPhone 4S with occasional Canon DSLR shots thrown in)


First I walked the welds up the thinner gaps as putting filler metal in place would have had the same effect (the welder would have just melted the thin sections) 


This also helps firm up the whole assembly for template making and welding.


Next I started cutting some filler pieces and welding in place.


Including over the top of the tunnel:


Another filler panel - this time I didn't make a template I just trimmed an offcut section by section using tin snips until perfect.


Tacked in place...


...and welded:


The next section looked fine when held up against the hole, but had to be cut in half and done as two pieces as it started to go astray where I've cut it.


And another under-body shot, this time of the driver's side.


I've still got to finish the smaller hump areas at the back and then possibly weld in new pieces from underneath the car where that was also trimmed.

More progress


As always, a half hour here and an hour there means that things (however little) get done, and every little job completed takes us one step closer to done!

Re-fitted the door handle that was painted in the update A few quick things


Cut the end of the exhaust off straight and welded on a section with a flange (taken from a falcon catalytic converter).

Then, I went to bed.

Today I started putting the transmission tunnel back together. First I cut out some paper templates, then held these over my donor metal and sprayed black spraypaint (hey, it's easier than marking out where I need to cut with a marker or scribe!)


Next I cut the pieces out with a pair of tin snips and then hammered back flat with a mallet.

Once that was done, I used a flaps wheel to remove the paint/primer from both sides of the donor metal.


And proceeded to weld them to the car and to each other.


The rubber inside the trans tunnel kept catching fire


Which meant the shed got a little smokey!


Here's the underside.